How to deploy your Minimal Me website on CloudFlare Pages for free
by Matt on April 30, 2024, 1:38 p.m.
Hooray! 🥳 You’re one step closer to getting your website online.
In this guide, I’ll show you how to customise your Minimal Me website template and deploy it on CloudFlare Pages for free at a domain of your choice.
Important ❗ If you follow the steps in this guide, you will be able to customise and deploy the site all by yourself. However, if you would like help customising and deploying your site, I (Matt) am very happy to help. To manage the volume of requests I get for assistance, I charge a $10 fee for this. I hope you can understand! Just send an email to hello[at]mattchapman[dot]co.
About the template
Before we get into the details of customisation and deployment, it will be useful for you to understand a little about how the template works.
Minimal Me is a static website template built with Next.js, a popular open-source React framework for building websites. If you’re not familiar with Next.js or React, don’t worry. This guide assumes no prior knowledge of web development or JavaScript.
What’s React? 🤔
React is a JavaScript library for building interactive user interfaces. It powers many of the world’s biggest websites including Facebook.com, GitHub.com, and many more.What’s a static website? 🤔
When I first heard the term “static website”, I assumed that this must be referring to those ugly 1990s-style single-page websites with Times New Roman text and no user interactivity. Thankfully, this is not the case! A static website can have as many pages as you want and, in terms of style and interactivity, a static website can look identical to a dynamic website (e.g., a Single-Page Application). The main difference between a static website and a dynamic website is that a static website’s content is all **pre-rendered**, whereas a dynamic website’s content is generated dynamically **on-the-fly** in response to a user’s actions, e.g., by pulling data from a database over an API. Static websites are highly performant and excellent for Search Engine Optimisation (SEO), and considerably less complex to set up than a SPA. By using a static website template, we’ll be avoiding a big headache later on.Uploading to GitHub
Before we can deploy your new website, we need to get the code onto GitHub.
If you haven’t got a GitHub account yet, you can create one for free by going to GitHub and following the prompts.
Next, create a new private repository.

I recommend calling it your-name, e.g., mattchapman or bob-jones.
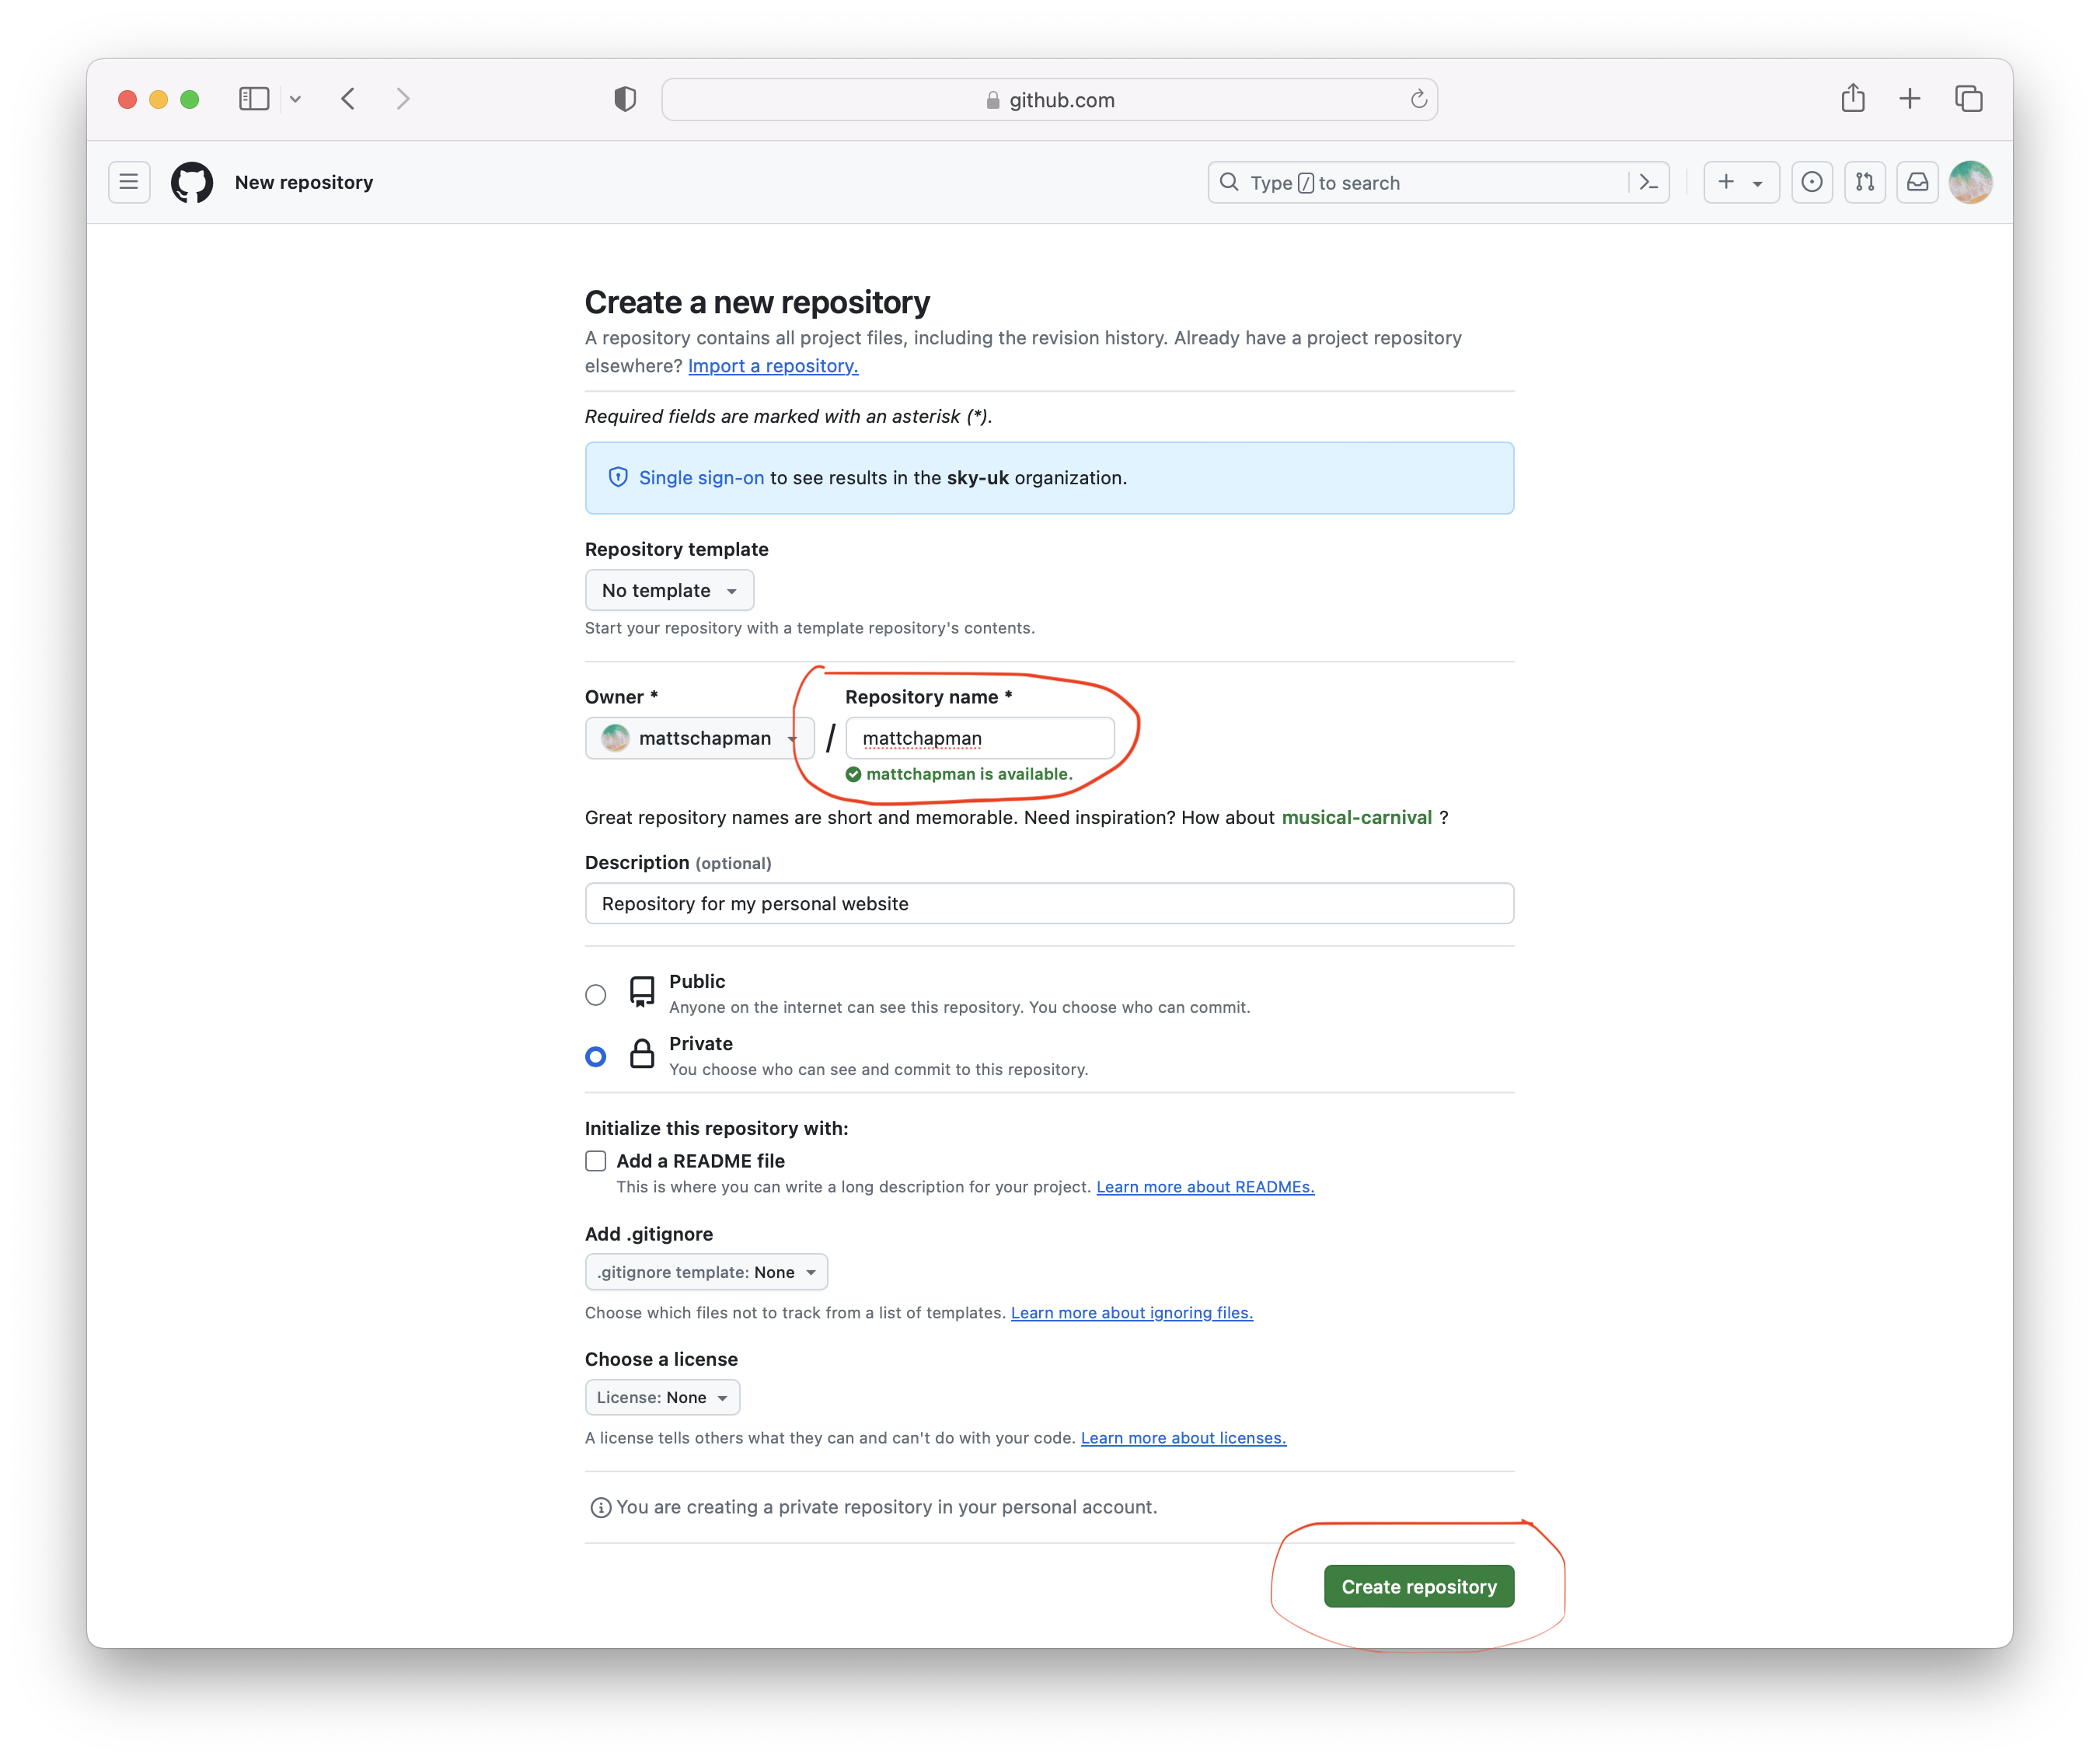
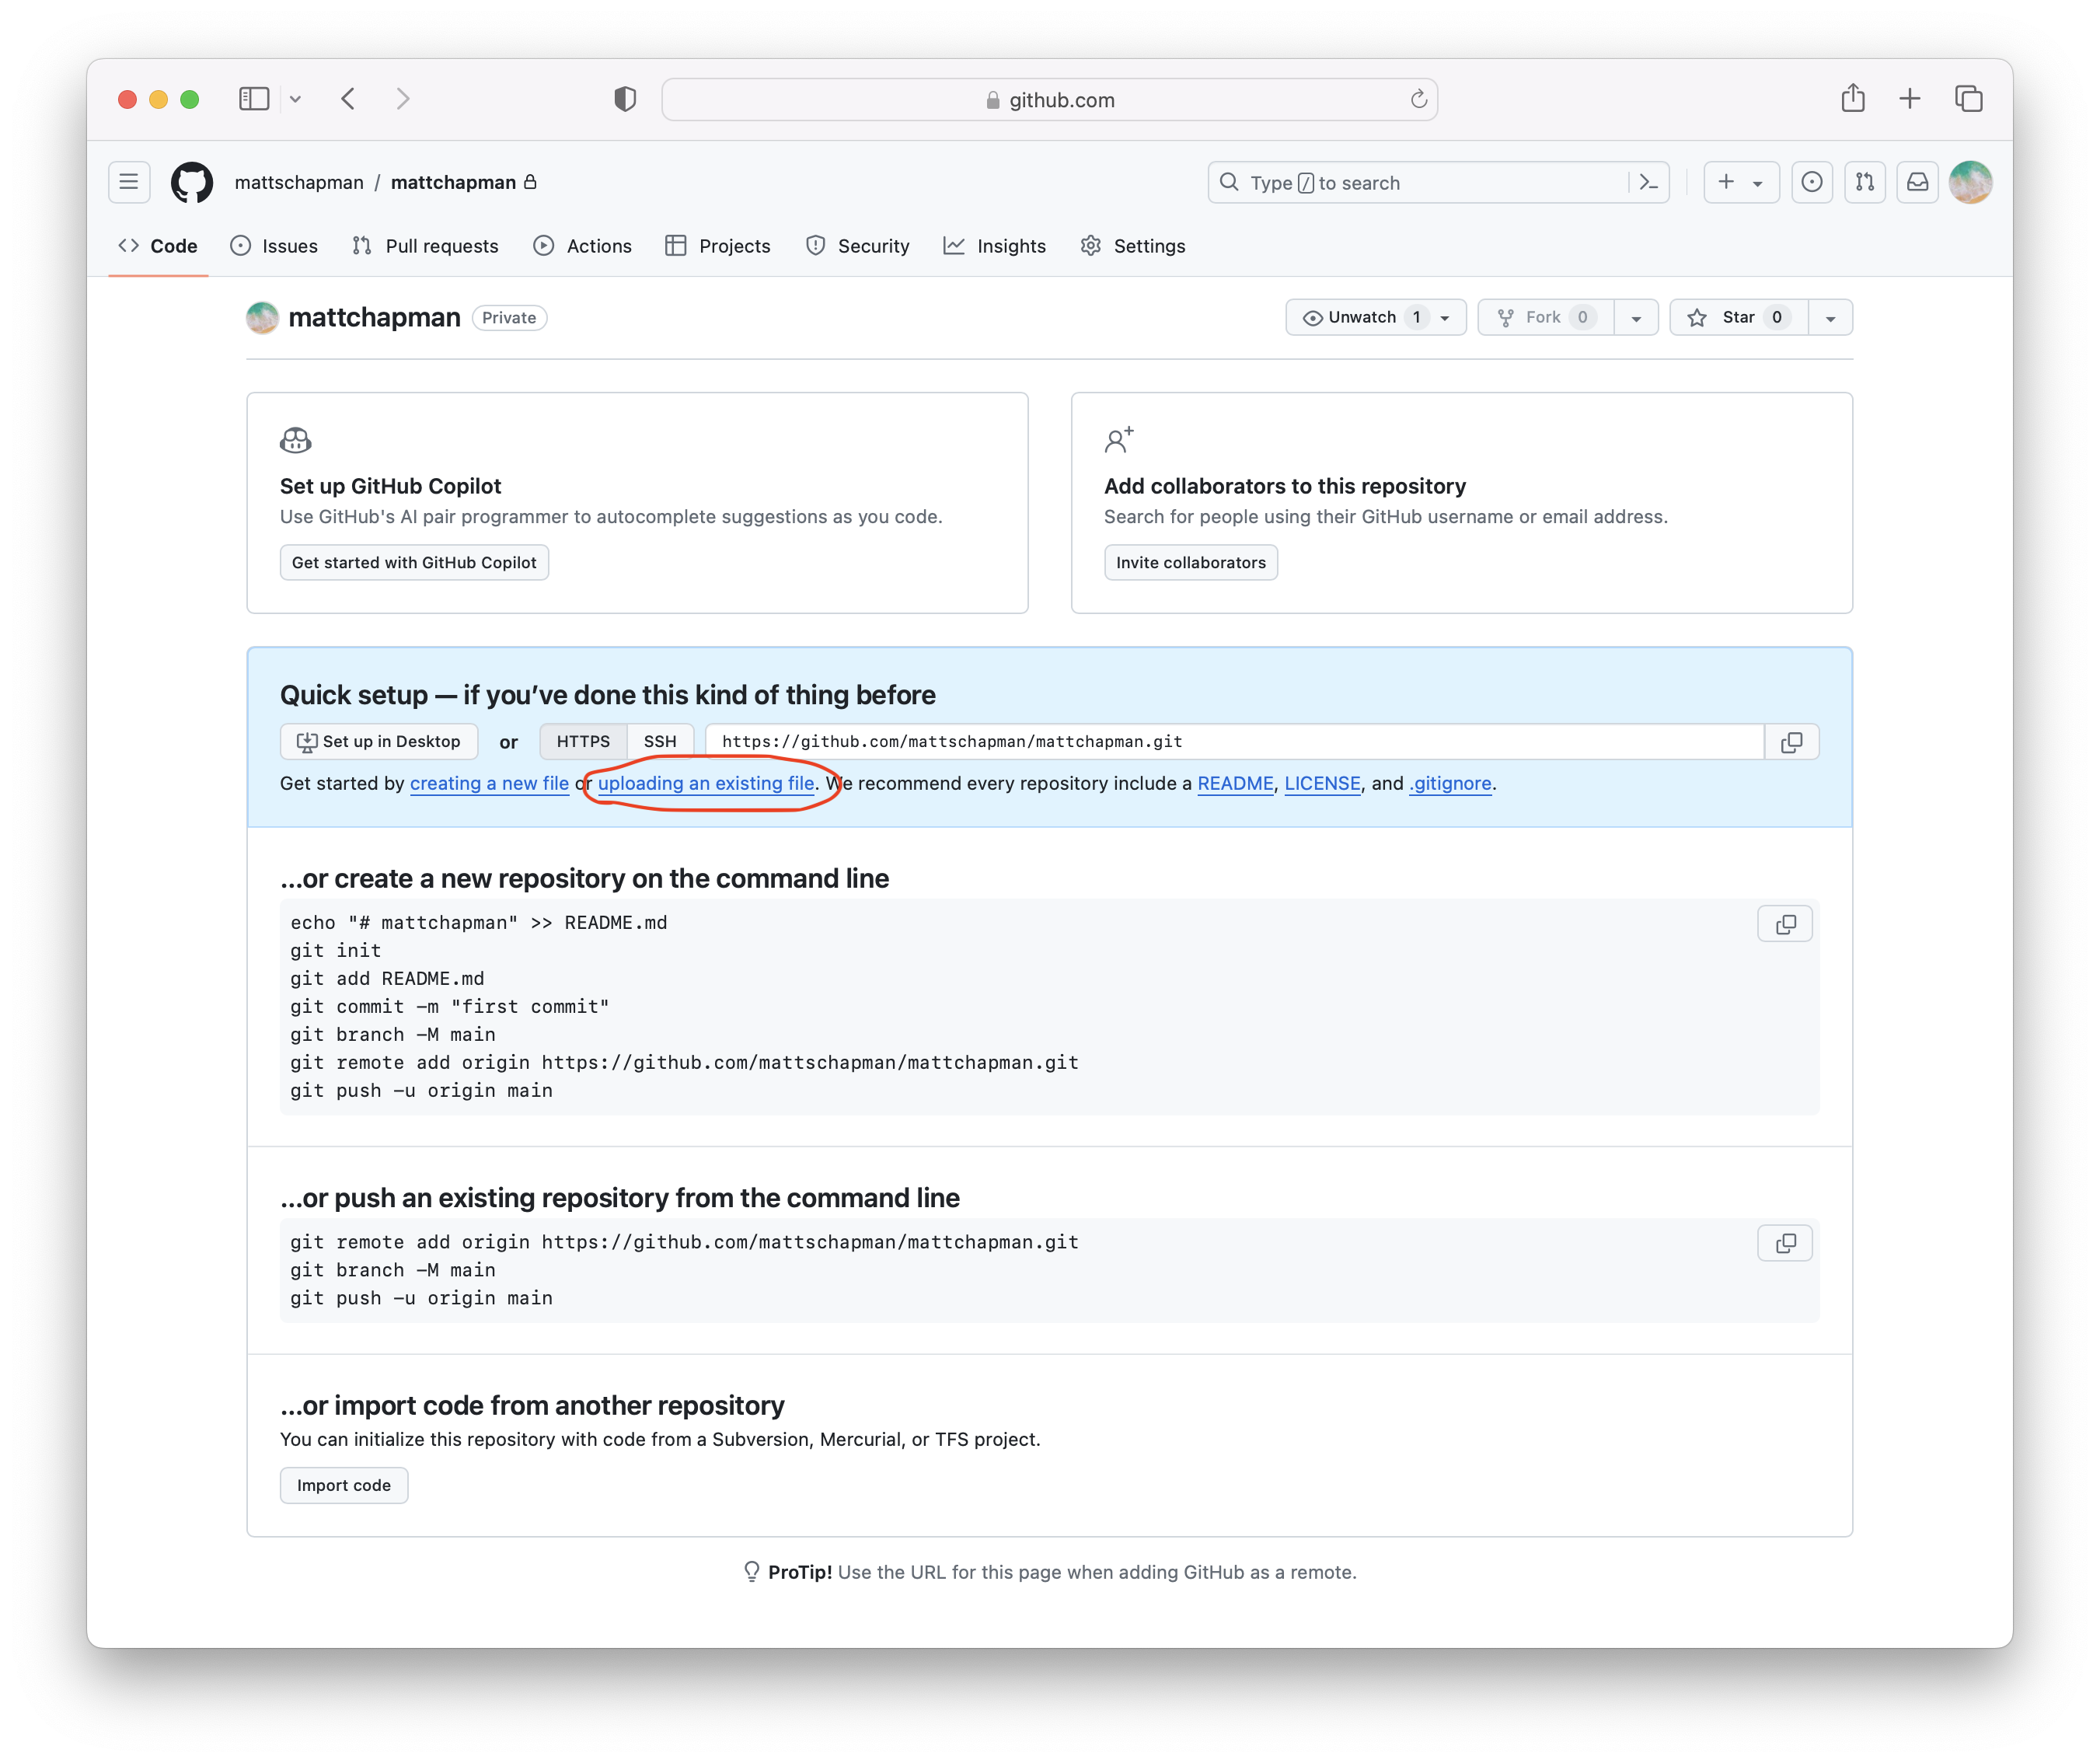
Once the private repository has been created, you’ll be prompted to upload or create some files. We will do this by uploading the (unzipped) folder which contains all the code for this site. (To unzip the minimal-me folder, just double-click it in your Finder/File Explorer.)
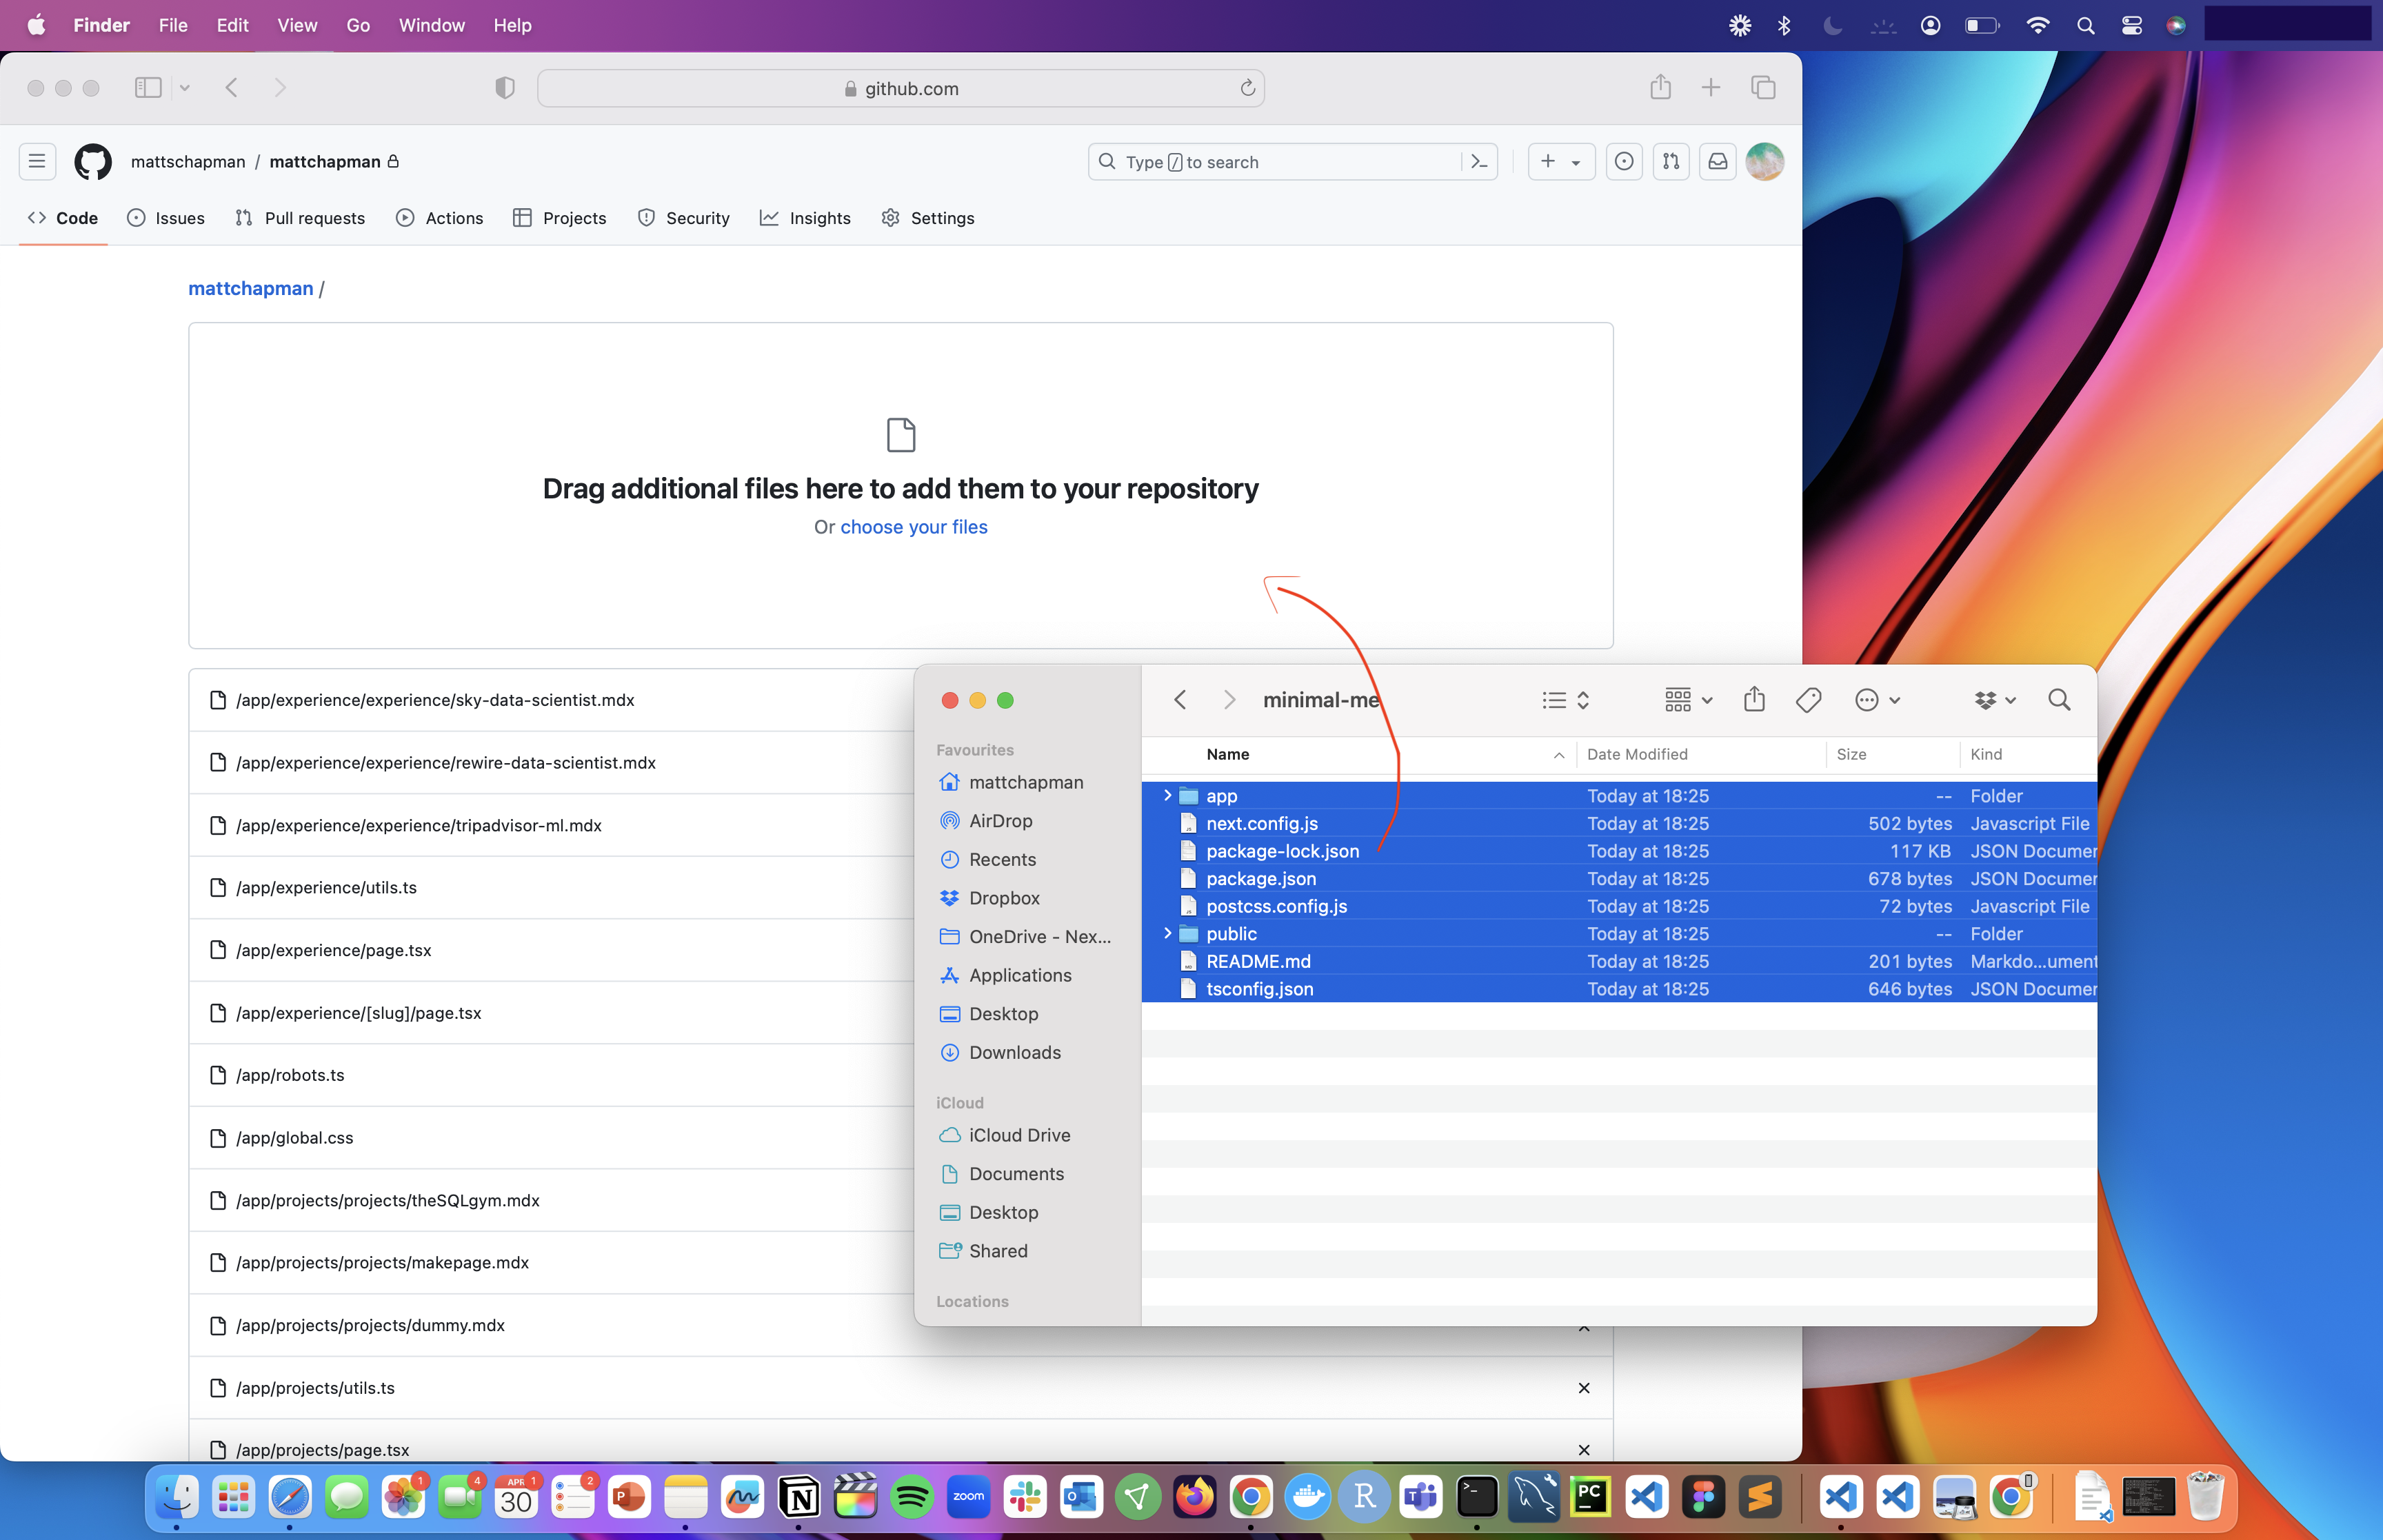
The easiest way to upload the template files is to click Upload files, then simply drag and drop from your Finder/File Explorer into the droppable space on GitHub.
Note ❗ You need to upload the files within the (unzipped)
minimal-mefolder. Do this by double-clicking theminimal-mefolder and selecting all the files.
Once the files have finished uploading, click Commit changes. You don't need to type a commit message.
Customising the template
Great! You’ve now got your code online on GitHub.
Before we “build” the website and launch it via CloudFlare, we need to customise the template so that it’s got your personal details instead of mine.
Note: While I will endeavour to explain the key concepts as I go, this guide is not a TypeScript/Next.js/React tutorial. I hope you will understand that, for the sake of brevity, I cannot go into details on how everything works in this codebase. For example, I won't explain the purpose of every single file in the codebase; I'll only talk about the ones you need to tweak. If I don't mention a file, assume that it's ok to be left as it is.
Now, with those caveats out of the the way, let's begin!
A quick note on how to edit the files ❗ To make things as easy as possible, in this guide I'll show you how to edit the code files directly within GitHub itself. If you like, you can clone the repository locally and open the files in an IDE like VS Code, but it's not necessary.
1. Essential steps
1.1 Add your name and bio
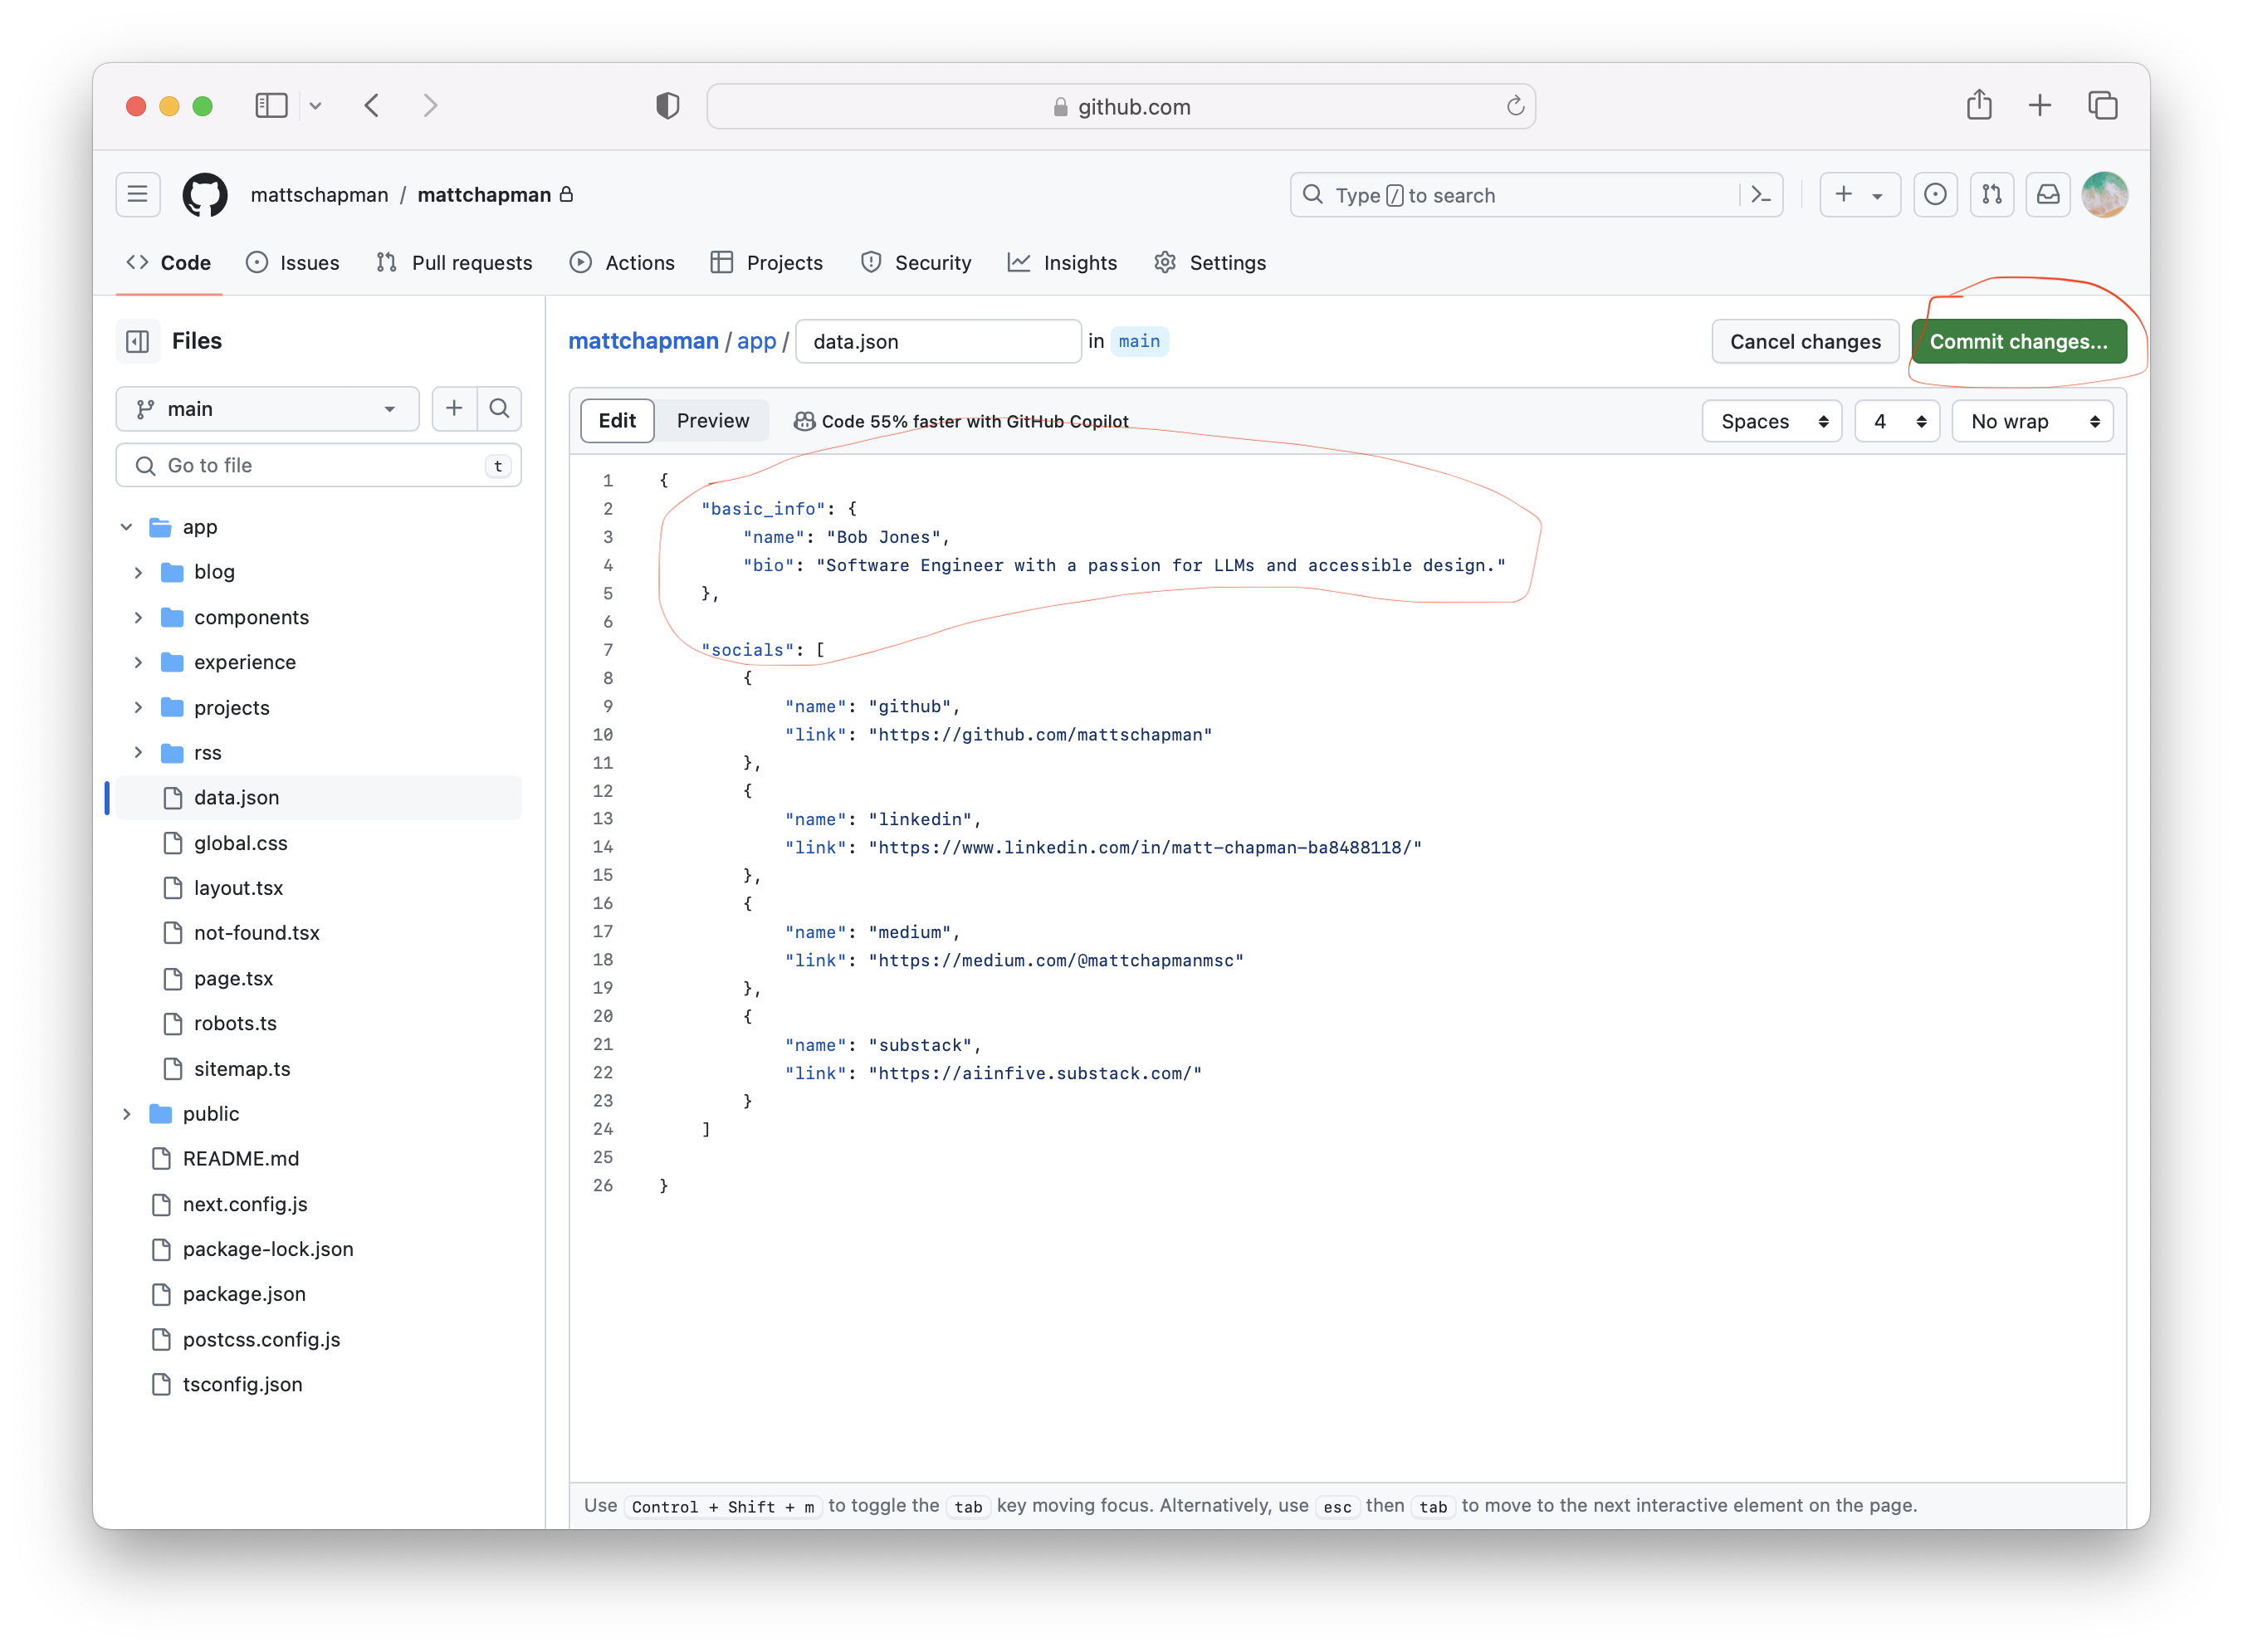
Open app/data.json and edit the information on lines 3 and 4:
"basic_info": {
    "name": "Matt Chapman",
    "bio": "XYZ years of experience across AI, analytics, tech, strategy and sales. I like building full-stack Data Science/ML products, writing stories and drinking tea."
},
so that it contains your name and bio:
"basic_info": {
    "name": "Bob Jones",
    "bio": "Software Engineer with a passion for LLMs and accessible design."
},
To open the file and make these changes within GitHub (i.e., not in a local IDE), navigate to yourrepository/app/data.json and click Edit this file:
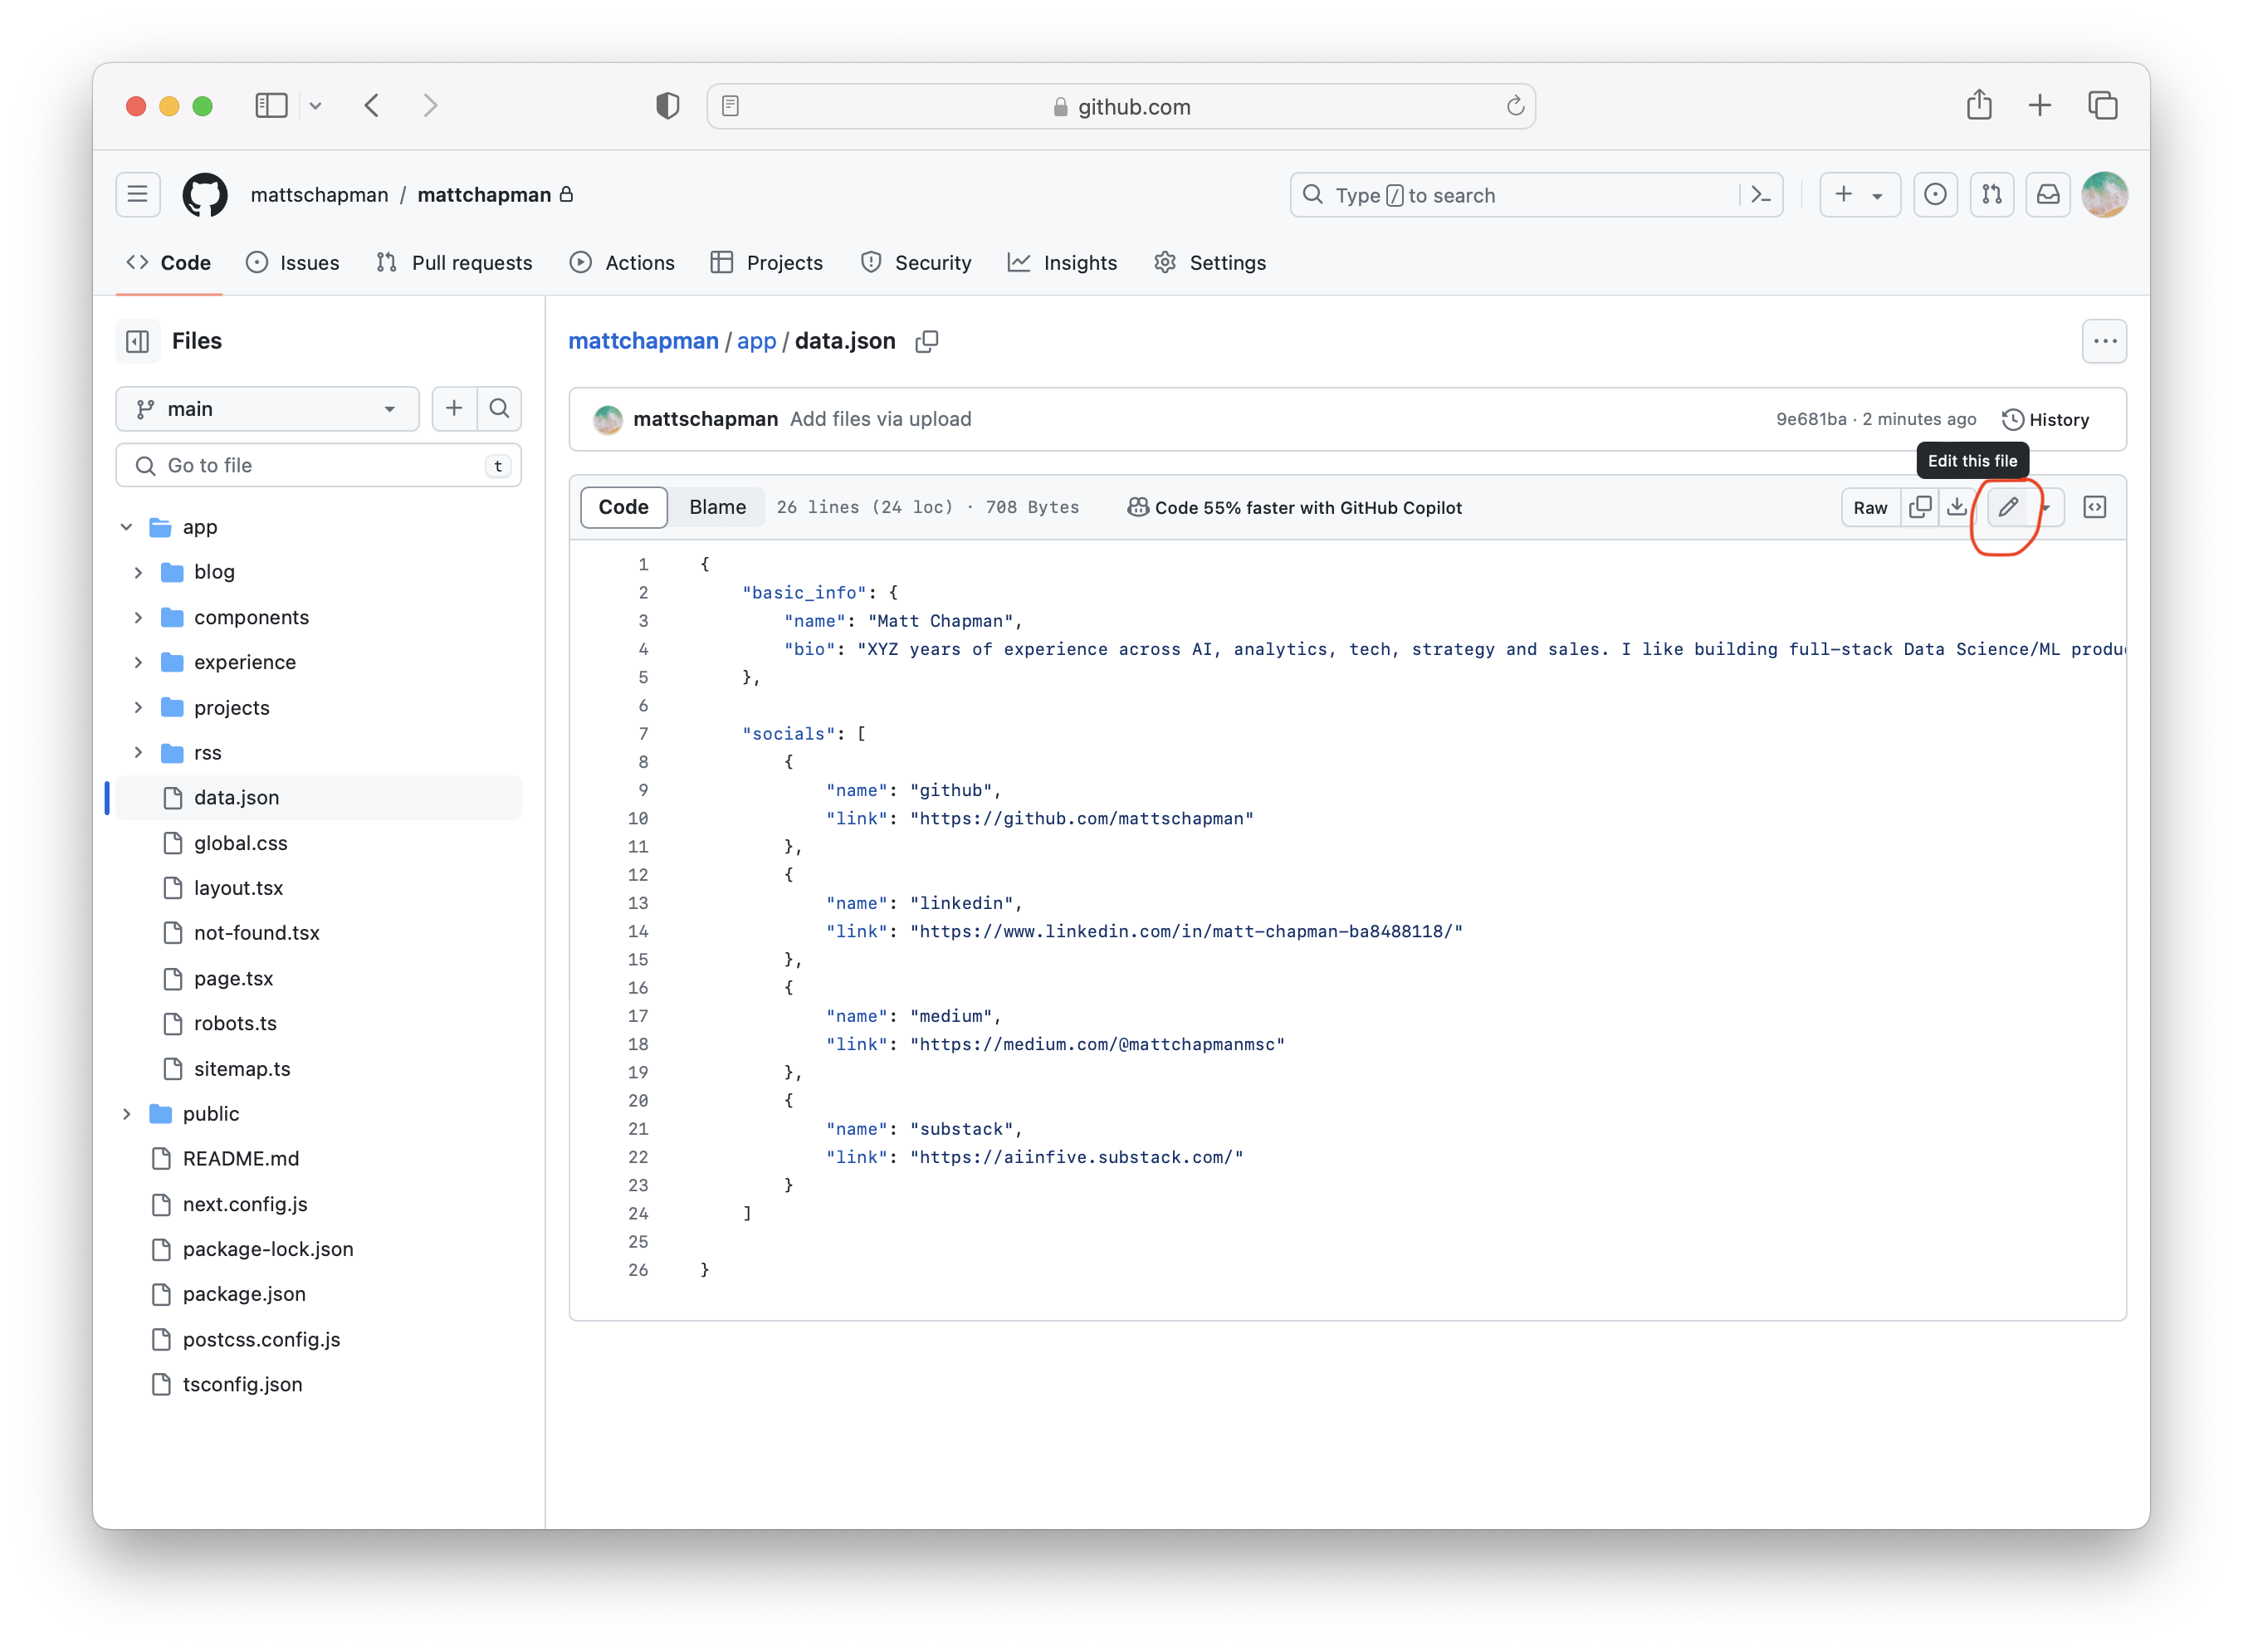
Then, once you've made your changes, click Commit changes...:
1.2 Change your hero image
The homepage of Minimal Me includes a hero image. By default, the image is a picture of Dubai.
To change this to an image of your choice, you need to do two things:
-
Upload your image to the
publicfolder (i.e., it should be in the same location as mydubai.avifimage). If you're not sure which image to use, I'd recommend looking on (Unsplash)[https://unsplash.com]. Any image format is fine. AVIF and webp are slightly more performant than jpeg and png, but don't worry if you can't get an image in these formats. Jpeg and png are absolutely fine. To upload the image, naviate topublic/and click Add file > Upload files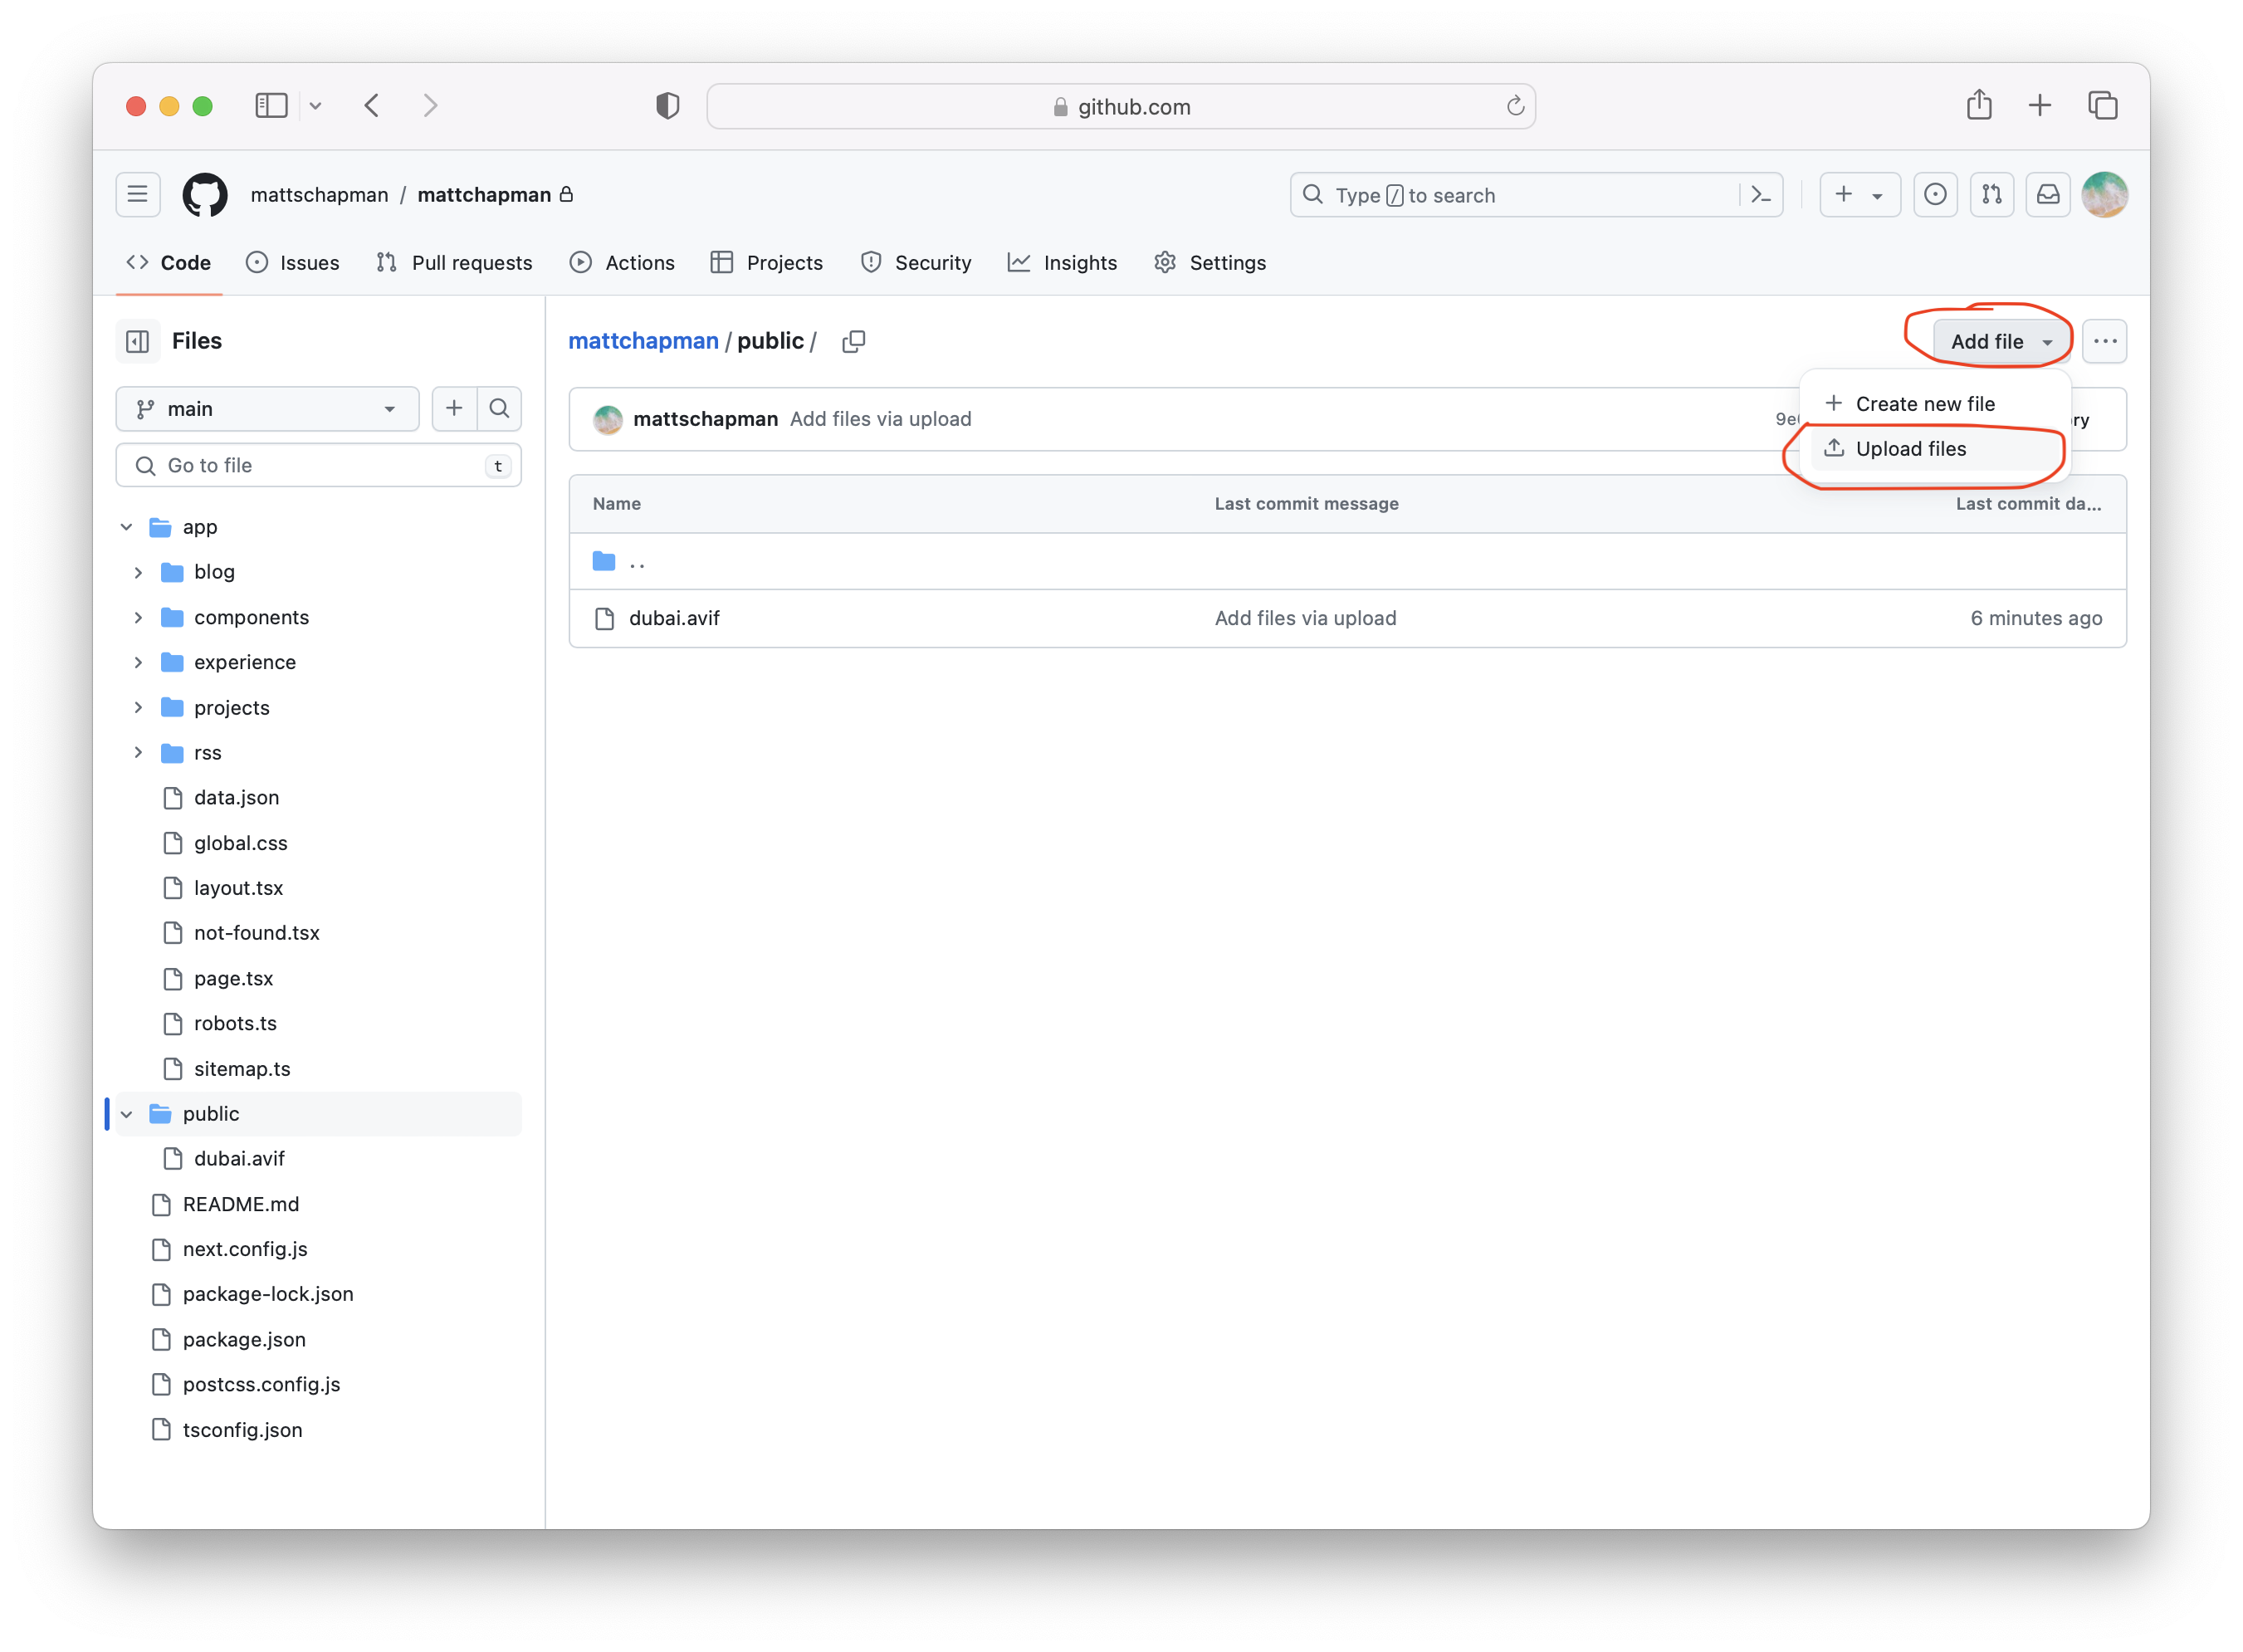
-
Once the image has been uploaded, you need to open the file
app/page.tsxand make a few changes. Note make sure that you are editing theapp/page.tsxfile, NOT anotherpage.tsxfile likeapp/blog/page.tsxorapp/projects/page.tsx.
a. First, edit line 6. Instead of:
import myPicture from 'public/dubai.avif';
change it to:
import myPicture from 'public/myimage.avif';
making sure to swap myimage.avif for the name of the image file you've just uploaded to the public folder. E.g., if your image is called holiday.jpeg then you'd write:
import myPicture from 'public/holiday.jpeg';
b. Next, change the image description on lines 18 AND 19. Instead of this:
<Image src={myPicture} priority={true} alt="A picture of Dubai" width="100" height="70" className="w-full my-2" />
<span className="flex flex-row justify-center text-sm text-gray-400">Dubai (my home!) - Image by <a href="https://unsplash.com/photos/city-during-day-VbDjv8-8ibc">ZQ Lee</a></span>
write your own description, e.g.,:
<Image src={myPicture} priority={true} alt="Me on holiday in Dubrovnik" width="100" height="70" className="w-full my-2" />
<span className="flex flex-row justify-center text-sm text-gray-400">Me on holiday in Dubrovnik</span>
If you’d like to include a link in the image caption (e.g., if you want to attribute the source, as I have done by referencing ZQ Lee’s profile on Unsplash), you can include an <a> element. E.g., if you downloaded an image from Facebook and the source is "https://facebook.com/images/myimage.jpeg", you'd write:
<Image src={myPicture} priority={true} alt="A picture of Dubai" width="100" height="70" className="w-full my-2" />
<span className="flex flex-row justify-center text-sm text-gray-400">Me on holiday in Dubrovnik - Image from <a href="https://facebook.com/images/myimage.jpeg">Facebook</a></span>
What if I don't want to include a hero image? 🤔
If you don’t want to include a hero image, simply comment out lines 6 and 17-20 (inclusive) in `app/page.tsx`. You can comment out line 6 by typing "//" at the start of the line, and you can comment out lines 17-20 by enclosing them in "{*" and "*}", i.e.:import { BlogPosts } from 'app/components/posts';
import { Projects } from 'app/components/projects';
import { Experience } from './components/experience';
import Image from 'next/image';
import Link from 'next/link'
// import myPicture from 'public/dubai.avif';
import Data from 'app/data.json';
export default function Page() {
return (
<>
<section>
<p className="mb-4">
{Data.basic_info.bio}
</p>
{/* <div className="my-10">
<Image src={myPicture} priority={true} alt="A picture of Dubai" width="100" height="70" className="w-full my-2" />
<span className="flex flex-row justify-center text-sm text-gray-400">Dubai (my home!) - Image by <a href="https://unsplash.com/photos/city-during-day-VbDjv8-8ibc">ZQ Lee</a></span>
</div> */}
1.3 Add your experiences
The “Experience” section is where you can list your jobs and professional experiences.
For each experience you wish to add, create a markdown file in the app/experience/experience/ directory.
What is markdown? 🤔
If you’ve not used markdown before, don’t worry — markdown is just a really simple way of formatting text. And when I say “simple”, I mean *really simple*: to write a heading, for example, you just put a hashtag in front of the text you want to be in your heading (i.e., “# My title”). To make a bullet point, you just put an asterisk in front of the text you want to be in your bulleted list (i.e., “* my bullet point”). You can read more about markdown on this (Markdown Cheat Sheet)[https://www.markdownguide.org/cheat-sheet/].Note: When you first look in the app/experience/experience/ folder, you'll see that there are three "placeholder" markdown files already:
app/experience/experience/
├── rewire-data-scientist.mdx
├── sky-data-scientist.mdx
└── tripadvisor-ml.mdx
The purpose of these placeholder files is to demonstrate the format you should use when defining your experiences. You can delete them after you’ve created your own experiences.
For example, if you want to add an experience as “Zookeeper at Chester Zoo from Jan 01 2020 to Jan 27 2022”, create a new markdown file called zookeeper-chester-zoo.mdx in the app/experience/experience/ folder.
This what you’d put inside the file:
---
title: 'Zookeeper'
organisation: 'Chester Zoo'
startDate: '2020-01-01'
endDate: '2022-01-27
summary: 'Worked as a Zookeeper in Chester Zoo. Did x, y, and even did some z.'
---

I worked as a Zookeeper in Chester Zoo for two years from 2020 to 2022. My responsibilities included...

My main achievements included:
* **Achievement 1** - I successfully did x and y
* **Achievement 2** - I also did z
* ...
If you don’t want to include an endDate for a particular experience (i.e., if you are still working in the role), simply omit the endDate line (line 4). E.g.,:
---
title: 'Zookeeper'
organisation: 'Chester Zoo'
startDate: '2020-01-01'
summary: 'Currently working as a Zookeeper in Chester Zoo. I do x, y, and even some z.'
---

I have been working as a zookeeper since January 2020. My responsibilities include...

My main achievements include:
* **Achievement 1** - I successfully did x and y
* **Achievement 2** - I also did z
* ...
You can add as many experiences as you like. Each time you want to add a new one, simply create a new markdown file with the same format as I used above.
What if I don’t want to include any experiences? 🤔
If you don’t want to include an ‘Experience’ section on your website, you’ll need to make two changes. First, remove the ‘Experience’ link from the navbar by opening `app/components/nav.tsx` and commenting out lines 5-7 (inclusive). I.e., change this:const navItems = {
'/experience': {
name: 'Experience',
},
'/blog': {
name: 'Blog',
},
'/projects': {
name: 'Projects',
},
}
const navItems = {
  // '/experience': {
  //   name: 'Experience',
  // },
  '/blog': {
    name: 'Blog',
  },
  '/projects': {
    name: 'Projects',
  },
}
import { BlogPosts } from 'app/components/posts';
import { Projects } from 'app/components/projects';
import { Experience } from './components/experience';
import Image from 'next/image';
import Link from 'next/link'
import myPicture from 'public/dubai.avif';
import Data from 'app/data.json';

export default function Page() {
  return (
    <>
      <section>
        <p className="mb-4">
          {Data.basic_info.bio}
        </p>
        <div className="my-10">
          <Image src={myPicture} priority={true} alt="A picture of Dubai" width="100" height="70" className="w-full my-2" />
          <span className="flex flex-row justify-center text-sm text-gray-400">Dubai (my home!) - Image by <a href="https://unsplash.com/photos/city-during-day-VbDjv8-8ibc">ZQ Lee</a></span>
        </div>

      </section>
      <section>
        <div className="my-8">
          <h2 className="mb-8 text-xl font-semibold">Exeprience</h2>
          <Experience/>
        </div>
      </section>
      <section>
          ...
import { BlogPosts } from 'app/components/posts';
import { Projects } from 'app/components/projects';
import { Experience } from './components/experience';
import Image from 'next/image';
import Link from 'next/link'
import myPicture from 'public/dubai.avif';
import Data from 'app/data.json';

export default function Page() {
  return (
    <>
      <section>
        <p className="mb-4">
          {Data.basic_info.bio}
        </p>
        <div className="my-10">
          <Image src={myPicture} priority={true} alt="A picture of Dubai" width="100" height="70" className="w-full my-2" />
          <span className="flex flex-row justify-center text-sm text-gray-400">Dubai (my home!) - Image by <a href="https://unsplash.com/photos/city-during-day-VbDjv8-8ibc">ZQ Lee</a></span>
        </div>

      </section>
      {/* <section>
        <div className="my-8">
          <h2 className="mb-8 text-xl font-semibold">Exeprience</h2>
          <Experience/>
        </div>
      </section> */}
      <section>
          ...
1.5 Add a blog
It’s entirely up to you whether you want to use the blog capabilities of Minimal Me.
Adding blog posts is a similar process to adding Projects and Experiences; each blog post is a markdown file stored in app/blog/posts/.
Each blog post markdown file has the same basic structure:
---
title: 'Another post'
publishedAt: '2024-04-26'
summary: 'Summary goes here'
---

Here's how to select all the data from a table in SQL:
...
As you can see, you can use markdown to write code snippets, which makes this perfect for writing technical blogs.
Every time you want to add a new blog post, simply create a new markdown file in app/blog/posts/. Make sure you delete the 6 placeholder blog posts I put in the template by default.
What if I don’t want to include a blog? 🤔
If you don’t want to include a ‘Blog’ section on your website, you’ll need to make two changes. First, remove the ‘Blog’ link from the navbar by opening `app/components/nav.tsx` and commenting out lines 11-13 (inclusive). I.e., change this:const navItems = {
'/experience': {
name: 'Experience',
},
'/blog': {
name: 'Blog',
},
'/projects': {
name: 'Projects',
},
}
const navItems = {
  '/experience': {
    name: 'Experience',
  },
  // '/blog': {
  //   name: 'Blog',
  // },
  '/projects': {
    name: 'Projects',
  },
}
import { BlogPosts } from 'app/components/posts';
import { Projects } from 'app/components/projects';
import { Experience } from './components/experience';
import Image from 'next/image';
import Link from 'next/link'
import myPicture from 'public/dubai.avif';
import Data from 'app/data.json';

export default function Page() {
  return (
    <>
      <section>
        <p className="mb-4">
          {Data.basic_info.bio}
        </p>
        <div className="my-10">
          <Image src={myPicture} priority={true} alt="A picture of Dubai" width="100" height="70" className="w-full my-2" />
          <span className="flex flex-row justify-center text-sm text-gray-400">Dubai (my home!) - Image by <a href="https://unsplash.com/photos/city-during-day-VbDjv8-8ibc">ZQ Lee</a></span>
        </div>

      </section>
      <section>
        <div className="my-8">
          <h2 className="mb-8 text-xl font-semibold">Exeprience</h2>
          <Experience/>
        </div>
      </section>
      <section>
        <div className="my-8">
          <h2 className="mb-8 text-xl font-semibold">Projects</h2>
          <Projects />
        </div>
      </section>
      <section>
        <div className="my-8">
          <h2 className="mb-8 text-xl font-semibold">Recent posts</h2>
          <BlogPosts limit={5} />
          <div className="flex flex-row items-center">
            <Link
              key={'/blog'}
              href={`/blog`}
              className="mt-4 mx-auto inline-flex items-center justify-center px-4 py-2 text-sm font-medium tracking-wide text-white transition-colors duration-200 rounded-md bg-neutral-950 hover:bg-neutral-900 focus:ring-2 focus:ring-offset-2 focus:ring-neutral-900 focus:shadow-outline focus:outline-none"
            >
              View all
            </Link>
          </div>
        </div>
      </section>
    </>
  )
}
import { BlogPosts } from 'app/components/posts';
import { Projects } from 'app/components/projects';
import { Experience } from './components/experience';
import Image from 'next/image';
import Link from 'next/link'
import myPicture from 'public/dubai.avif';
import Data from 'app/data.json';

export default function Page() {
  return (
    <>
      <section>
        <p className="mb-4">
          {Data.basic_info.bio}
        </p>
        <div className="my-10">
          <Image src={myPicture} priority={true} alt="A picture of Dubai" width="100" height="70" className="w-full my-2" />
          <span className="flex flex-row justify-center text-sm text-gray-400">Dubai (my home!) - Image by <a href="https://unsplash.com/photos/city-during-day-VbDjv8-8ibc">ZQ Lee</a></span>
        </div>

      </section>
      <section>
        <div className="my-8">
          <h2 className="mb-8 text-xl font-semibold">Exeprience</h2>
          <Experience/>
        </div>
      </section>
      <section>
        <div className="my-8">
          <h2 className="mb-8 text-xl font-semibold">Projects</h2>
          <Projects />
        </div>
      </section>
      {/* <section>
        <div className="my-8">
          <h2 className="mb-8 text-xl font-semibold">Recent posts</h2>
          <BlogPosts limit={5} />
          <div className="flex flex-row items-center">
            <Link
              key={'/blog'}
              href={`/blog`}
              className="mt-4 mx-auto inline-flex items-center justify-center px-4 py-2 text-sm font-medium tracking-wide text-white transition-colors duration-200 rounded-md bg-neutral-950 hover:bg-neutral-900 focus:ring-2 focus:ring-offset-2 focus:ring-neutral-900 focus:shadow-outline focus:outline-none"
            >
              View all
            </Link>
          </div>
        </div>
      </section> */}
    </>
  )
}
1.6 Change the metadata
Open app/layout.tsx. You'll see that, at the moment, your site has some generic metadata:
...

export const metadata: Metadata = {
  metadataBase: new URL(baseUrl),
  title: {
    default: 'Matt Chapman',
    template: '%s | My personal website',
  },
  description: 'This is my portfolio.',
  openGraph: {
    title: 'My Portfolio',
    description: 'This is my portfolio.',
    url: baseUrl,
    siteName: 'My Portfolio',
    locale: 'en_US',
    type: 'website',
  },

...
Edit this so that it matches your personal info. For example, you might change it to:
...

export const metadata: Metadata = {
  metadataBase: new URL(baseUrl),
  title: {
    default: 'Bob Jones',
    template: '%s | My personal website',
  },
  description: 'Personal website of Bob Jones.',
  openGraph: {
    title: 'Bob Jones',
    description: 'Personal website of Bob Jones.',
    url: baseUrl,
    siteName: 'Bob Jones',
    locale: 'en_US',
    type: 'website',
  },

...
1.7 Change your external links
In app/data.json, it lists the different external links which appear in the app/components/footer.tsx component (i.e., the footer). Here's the default:
"socials": [
        {
            "name": "github",
            "link": "https://github.com/mattschapman"
        },
        {
            "name": "linkedin",
            "link": "https://www.linkedin.com/in/matt-chapman-ba8488118/"
        },
        {
            "name": "medium",
            "link": "https://medium.com/@mattchapmanmsc"
        },
        {
            "name": "substack",
            "link": "https://aiinfive.substack.com/"
        }
    ]
Edit these data so that they point to the links of your choice. You can add as many links as you like. If you’d like fewer than four links, just remove them as you need.
2. Optional steps
2.1 Change the favicon
The favicon is the little icon that appears in your browser tab next to the website title. By default, this will be a 🇬🇧 emoji. You can change it by opening app/layout.tsx and changing line 56. I.e., if you wanted to make the Jamaican flag 🇯🇲 your favicon, you'd change this:
<link rel="icon" href="data:image/svg+xml,<svg xmlns=%22http://www.w3.org/2000/svg%22 viewBox=%220 0 100 100%22><text y=%22.9em%22 font-size=%2290%22>🇬🇧</text></svg>" />
to this:
<link rel="icon" href="data:image/svg+xml,<svg xmlns=%22http://www.w3.org/2000/svg%22 viewBox=%220 0 100 100%22><text y=%22.9em%22 font-size=%2290%22>🇯🇲</text></svg>" />
You can use any emoji you like.
2.2 Change the order of the Experience/Projects/Blog sections
I’ve used a modular approach to building this template, which makes it easy to reorder the elements on the homepage.
An example
Let’s say you want to showcase the Projects section above your Experience section. To do this, open up `app/page.tsx`:import { BlogPosts } from 'app/components/posts';
import { Projects } from 'app/components/projects';
import { Experience } from './components/experience';
import Image from 'next/image';
import Link from 'next/link'
import myPicture from 'public/dubai.avif';
import Data from 'app/data.json';
export default function Page() {
return (
<>
<section>
<p className="mb-4">
{Data.basic_info.bio}
</p>
<div className="my-10">
<Image src={myPicture} priority={true} alt="A picture of Dubai" width="100" height="70" className="w-full my-2" />
<span className="flex flex-row justify-center text-sm text-gray-400">Dubai (my home!) - Image by <a href="https://unsplash.com/photos/city-during-day-VbDjv8-8ibc">ZQ Lee</a></span>
</div>
</section>
<section>
<div className="my-8">
<h2 className="mb-8 text-xl font-semibold">Exeprience</h2>
<Experience/>
</div>
</section>
<section>
<div className="my-8">
<h2 className="mb-8 text-xl font-semibold">Projects</h2>
<Projects />
</div>
</section>
...
import { BlogPosts } from 'app/components/posts';
import { Projects } from 'app/components/projects';
import { Experience } from './components/experience';
import Image from 'next/image';
import Link from 'next/link'
import myPicture from 'public/dubai.avif';
import Data from 'app/data.json';

export default function Page() {
  return (
    <>
      <section>
        <p className="mb-4">
          {Data.basic_info.bio}
        </p>
        <div className="my-10">
          <Image src={myPicture} priority={true} alt="A picture of Dubai" width="100" height="70" className="w-full my-2" />
          <span className="flex flex-row justify-center text-sm text-gray-400">Dubai (my home!) - Image by <a href="https://unsplash.com/photos/city-during-day-VbDjv8-8ibc">ZQ Lee</a></span>
        </div>

      </section>
      <section>
        <div className="my-8">
          <h2 className="mb-8 text-xl font-semibold">Projects</h2>
          <Projects />
        </div>
      </section>
      <section>
        <div className="my-8">
          <h2 className="mb-8 text-xl font-semibold">Exeprience</h2>
          <Experience/>
        </div>
      </section>
      ...
2. Deploying your site
Well done - the hard bit is over! We’ve customised the site with your data and we’re ready to deploy.
To deploy the site, we’ll use CloudFlare Pages, which is a free way to deploy your site directly from a GitHub repository.
Why CloudFlare? Well, there are a few reasons:
- Ease — CloudFlare is an “all-in-one” platform — it gives you domains, hosting, and analytics all in the same place. GitHub Pages only provides the hosting; you’d need to use other services (e.g., Google Analytics, GoDaddy) to get the domain and analytics.
- Speed and security — CloudFlare includes a global Content Delivery Network (CDN) by default (this makes your website load really fast) and includes some protections against DDoS attacks and bots.
Now, let’s dive into the details.
2.1 Create a CloudFlare account
This is completely free to do. Head to CloudFlare and create a Free account.
2.2 Create a new Pages application
- Go to the CloudFlare dashboard and select Workers & Pages > Create application > Pages > Connect to Git
- Select the GitHub repository we created earlier (e.g.,
your-nameormattchapman). If you can’t see your repository, follow the instructions in the CloudFlare panel. Alternatively, go to https://github.com/settings/installations and give CloudFlare access to that repository.
Once you’ve provisioned access, select the new GitHub repository that you created and, in the Set up builds and deployments section, select Next.js (Static HTML Export) as your Framework preset. By default, this will prefill the configuration options with the following information:
| Configuration option | Value          |
|----------------------|----------------|
| Production branch    | main           |
| Build command        | npx next build |
| Build directory      | out            |
At this stage, we need to make a small change: swap npx next build for npm run build. Leave the other options as they are.
2.3 Deploy
After configuring your site, you can begin your first deploy. Click Next, and Cloudflare Pages will start installing Next.js and your project dependencies, then it will build and deploy your site.
You can see all of this happening in the “Logs” panel. It might take a couple of minutes before deployment is completed.
What’s happening under the hood? 🤔
When we press **Next**, CloudFlare runs the comment `npm run build` on all the code in the `main` branch of our GitHub repository. In effect, what happens is that our raw code will be compiled into a collection of HTML webpages stored in the `out` directory, which are then served by CloudFlare. (This build-and-compile-at-deployment approach means that our app is a static site.)2.4 Preview your site
After deploying your site, you will receive a unique subdomain for your project on *.pages.dev (e.g., "mattchapman.pages.dev" or "bob-jones.pages.dev" or "your-repo.pages.dev"). If your repo has a generic name and the *.pages.dev subdomain for that name is already taken, CloudFlare might add some random numbers to the first term in the domain.
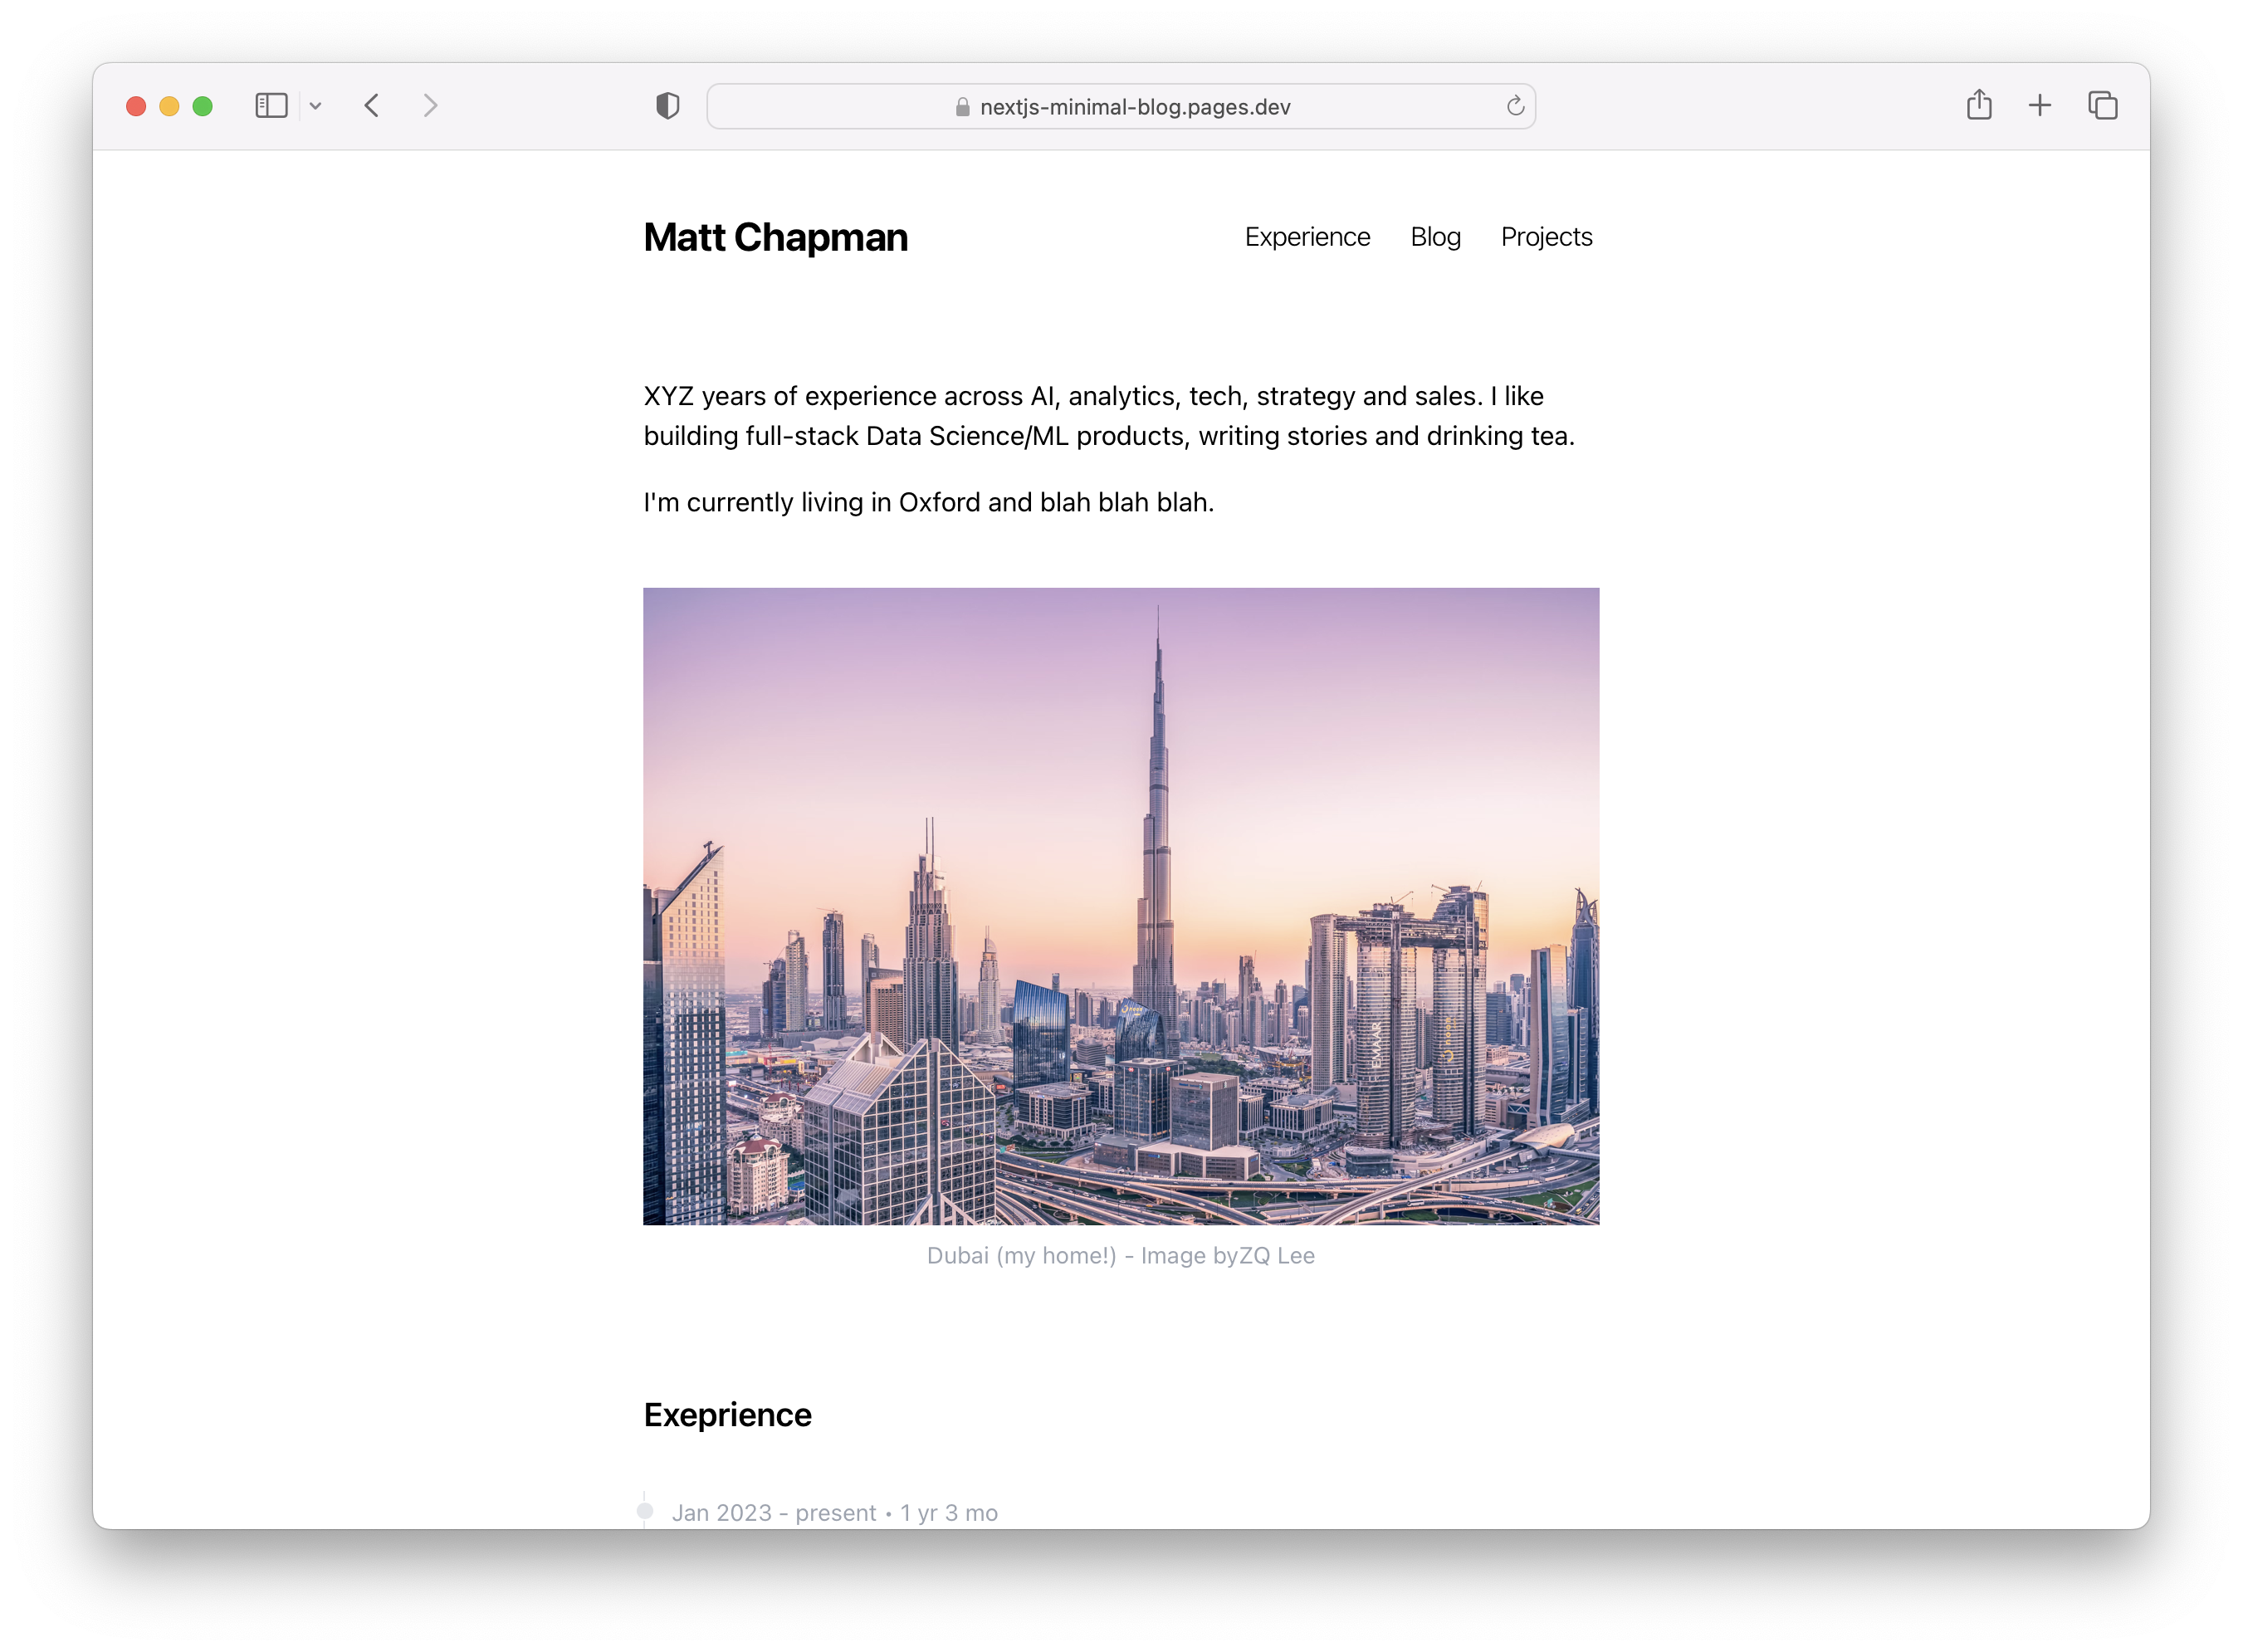
Every time you commit new code to your Next.js site, Cloudflare Pages will automatically rebuild your project and deploy it.
You will also get access to preview deployments on new pull requests, so you can preview how changes look to your site before deploying them to production.
For the complete guide to deploying your first site to Cloudflare Pages, refer to CloudFlare’s Get started guide.
3. Using a custom domain
CloudFlare gives the option to use a custom domain for your site, instead of the *.pages.dev domain you are automatically assigned. If you'd like to do this, take a look at the CloudFlare docs on custom domains. Note that if you don't already own a domain, you'll need to buy one. You can do this directly through CloudFlare at cost price.
Conclusion
That's all! I hope this has been helpful. If you've got any questions or need any help, send an email to hello[at]mattchapman[dot]co and I'll do my best to support.